One of the most helpful troubleshooting tools for WordPress is knowing what is going on in the WordPress installation environment. The phpinfo file is a tiny bit of code that can identify what version PHP is using, how much memory is allocated, precisely what modules are available, and most importantly, which modules aren’t. Create a php info file.

The phpinfo.php file consists of one line of code. <? phpinfo(); ?>
This short file calls on the server to return information about the PHP environment. If you are troubleshooting why things aren’t working properly then this is a great place to start.
Table of Contents
How to create a PHP Info file
- Log into your cPanel with your hosting provider.
- In the FILES section of cPanel, open the FILE MANAGER and check the box to show all hidden files.
- Navigate to the root folder where the domain you are working on resides. Typically, this is ‘public_html‘ or ‘http_root‘. However, you may have multiple sites, so if WordPress, for instance, is in its own folder, then navigate to the same folder as wp_config.php resides.
- Once in the root folder, click the add file button at the top ribbon.
- Create a file name as “phpinfo.php” and hit save.
- Click edit on the phpinfo.php file, which is currently blank, and type the following code within the file.
<? phpinfo(); >?7. Save Changes and close the file.
How to view your PHP Settings
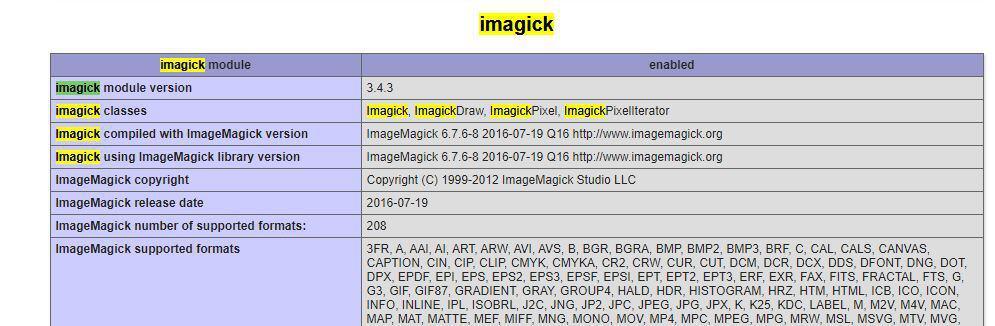
Viewing the output of the phpinfo file is very simple. After the file has been created and placed in the root folder of the domain you are working with type that domain and append the file name – https://domain.com/phpinfo.php (swap domain.com with your own domain). The server will output a long HTML file similar to the one below within the header you will see the version of PHP being used.
Common things to look for in your phpinfo file for troubleshooting
The most common reasons to view your phpinfo file for troubleshooting are:
- Determine the PHP version
- View the memory limits
- Discover if WebP conversion is supported
PHP Version – As your web app “grows” over time. Meaning newer and more improved versions of your web application are implemented, and you click that update/upgrade button. Eventually, the backend PHP has to do the same to support the newer features. There will come a time you will need to ensure you are running the latest stable release of PHP on your web host. When you view the phpinfo.php file, you will see in the header the PHP version that your web app, such as WordPress, is using.
Memory Limits – A shortage of memory is a common issue for web applications. As your web application continues to improve over time, your hosting provider may not improve your server. In any case, you may need to check your memory limit to ensure your app has what it needs if you are getting memory limit errors.

Webp support – The latest and greatest compression technique for images is to convert the images to WebP format. A plugin can do this on the fly for you and is very helpful, but not all servers support the needed modules for this to work. I’ve found most all VPS (Virtual Private Servers) have this turned on, but most shared hosting does not.
To verify, you can look at the phpinfo page and hit CTRL-F, and type IMAGICK. Imagick is the tool that WordPress and other apps use to compress, convert, and/or optimize images on the fly. If WebP is not supported in the supported formats section, then the plugin is basically worthless, and you should convert them outside of WordPress before uploading if you want to use the WebP format.
Keep it secure – delete the file
Once you have completed troubleshooting your web application, it is a very good practice to undo or delete the files that you were using to troubleshoot. Always make sure you delete the phpinfo.php file after you are done. If you changed any file permissions to write that normally shouldn’t be, change those back. If you turned a debug on, make sure you set that back to FALSE.
Good luck!
see also: How to Choose the Best Linux Distribution,How To Make A USB Bitcoin Wallet